Skip to content


Surgical instrument sterilization is a critical part of infection prevention in hospitals, operating theatres, clinics and other healthcare facilities. Reusable instruments such as forceps, scissors, needle holders and retractors must undergo appropriate reprocessing before they can be used on another patient.
However, sterilization is not simply a matter of placing instruments inside an autoclave. Effective reprocessing involves several connected stages, including initial handling, thorough cleaning, inspection, preparation, packaging, sterilization, monitoring and protected storage.
A failure at any stage can compromise the final result. Blood or tissue remaining on an instrument, an unsuitable sterilization cycle, incorrect loading or damaged packaging can prevent instruments from being safely returned to service.
According to the World Health Organization’s guidance on medical device reprocessing, each stage of decontamination and reprocessing requires appropriate procedures and quality controls.
This guide explains the main sterilization methods, the correct general workflow, common mistakes and the factors healthcare facilities should consider when selecting sterilization equipment.
What Is Surgical Instrument Sterilization?
Sterilization is a validated process designed to eliminate all forms of viable microbial life, including bacterial spores, from a medical device.


It is different from cleaning and disinfection.
- Cleaning removes visible soil, blood, tissue, residues and other contaminants from instrument surfaces.
- Disinfection inactivates many or all pathogenic microorganisms, depending on the level and method used, but may not eliminate bacterial spores.
- Sterilization uses a validated process to achieve sterility for instruments that require it.
These processes are related, but they are not interchangeable. Cleaning is an essential prerequisite because residual organic material can interfere with subsequent disinfection or sterilization.
The US Centers for Disease Control and Prevention (CDC) recommends sterilizing critical medical and surgical instruments that enter normally sterile tissue or the vascular system before use on each patient.
The appropriate reprocessing method depends on the device’s intended use, design, materials and manufacturer instructions.
Why Is Proper Surgical Instrument Sterilization Important?
Proper sterilization supports patient safety, instrument management and reliable clinical operations.
1. Infection prevention
Surgical instruments may contact blood, tissue and other potentially infectious material. Appropriate reprocessing reduces the risk of transferring microorganisms between patients.
2. Reliable clinical procedures
Surgical teams need instruments that have completed the required processing cycle and meet the facility’s release criteria.
3. Instrument longevity
Suitable cleaning, rinsing, drying and maintenance help protect reusable instruments from corrosion, staining and mechanical damage.
4. Quality assurance and traceability
Documented processing procedures help facilities investigate failures, monitor performance and demonstrate that appropriate controls are in place.
5. Consistent sterile supply
A reliable workflow helps sterile processing departments provide the right instruments, in the right condition, when clinical teams need them.
Main Methods of Surgical Instrument Sterilization
Different sterilization methods are appropriate for different instruments. The correct choice depends on heat and moisture tolerance, device design, packaging compatibility and the validated instructions for the specific device and sterilizer.
1. Steam sterilization (autoclaving)
Steam sterilization uses saturated steam under pressure to expose compatible instruments to a validated combination of temperature and exposure time.
It is the preferred method for many reusable surgical instruments that tolerate heat, moisture and pressure.
Common considerations:
- Use a validated cycle appropriate for the load.
- Ensure effective cleaning and suitable packaging.
- Load instruments to allow steam penetration and drainage.
- Verify cycle parameters and required monitoring results.


2. Dry heat sterilization
Dry heat sterilization uses heated air over a validated period. It may be suitable for selected materials and devices that can withstand the required temperature but are not suitable for steam processing.
It generally requires longer exposure than steam sterilization and is not appropriate for every surgical instrument.
Common considerations:
- Confirm material compatibility.
- Follow the device and sterilizer instructions.
- Use a validated cycle and suitable monitoring procedures.


See the dry heat sterilizer listed by FRAGO IMPEX.
3. Low-temperature sterilization
Low-temperature technologies, including hydrogen peroxide-based systems and ethylene oxide (EtO), can be used for selected heat-sensitive or moisture-sensitive devices.
These technologies have different material restrictions, processing requirements and safety considerations.
Common considerations:
- Confirm compatibility with the specific instrument.
- Check whether the device’s lumens and complex features are supported by the system.
- Follow any required aeration, handling and release procedures.
Not every low-temperature method is suitable for every device.
The CDC identifies steam as the preferred method for compatible critical surgical instruments and recommends low-temperature technologies for suitable heat-sensitive equipment. Read its sterilization practices guidance.
Comparison of sterilization methods
| Method | Typical application | Important limitation |
|---|---|---|
| Steam autoclaving | Heat- and moisture-compatible surgical instruments | Unsuitable for devices that cannot tolerate the process |
| Dry heat | Selected heat-resistant devices and materials | Higher temperatures and longer cycles may restrict use |
| Hydrogen peroxide-based systems | Compatible heat-sensitive devices | Material, lumen and packaging restrictions apply |
| Ethylene oxide | Selected heat- and moisture-sensitive devices | Requires controlled processing and appropriate aeration |
These are general comparisons, not instructions for selecting a cycle. Always follow the validated instructions for the specific device, sterilizer and packaging system.
Step-by-Step: The Surgical Instrument Sterilization Process
Sterilization is one part of a broader reprocessing workflow. Healthcare facilities should establish procedures for every stage and ensure that staff are trained to follow them.
Step 1: Initial handling after use
Begin appropriate instrument care as soon as practical after the procedure.
Blood and tissue can dry onto instrument surfaces, making subsequent cleaning more difficult. Follow the instrument manufacturer’s point-of-use instructions to prevent soil from drying while avoiding practices that may damage the device.
Used instruments should be handled and transported using appropriate protective equipment and designated procedures.
Important: Do not use saline or other unsuitable solutions for holding instruments unless specifically directed by the manufacturer’s instructions.
Step 2: Transport to the reprocessing area
Transport contaminated instruments in suitable, designated containers that protect staff and prevent spills or environmental contamination.
Facilities should maintain a clear separation between contaminated items and cleaned or sterile supplies.
A controlled workflow helps reduce cross-contamination and supports consistent processing.
Step 3: Thorough cleaning
Cleaning removes blood, tissue, debris and other residues that may interfere with sterilization.
Depending on the device and facility, cleaning may involve:
- Manual cleaning with a compatible detergent.
- Mechanical cleaning using a suitable washer-disinfector.
- Ultrasonic cleaning where permitted by the instrument manufacturer’s instructions.
- Disassembly of removable components where required.
- Careful attention to hinges, serrations, joints and other difficult-to-clean areas.
Cleaning agents, water quality, concentration, contact time and rinsing procedures must follow the applicable instructions.
The CDC cleaning recommendations emphasize removing organic and inorganic residues before sterilization.
Step 4: Rinsing and drying
Rinse instruments as required to remove detergent and cleaning residues. Dry them thoroughly using a method compatible with the device.
Trapped moisture may contribute to corrosion, staining, packaging problems and wet packs after sterilization.
Pay particular attention to hinges, joints, channels and other areas where water may remain.
Step 5: Inspection and functional checks
Inspect each instrument under adequate lighting. Magnification may be useful for delicate or complex instruments.
Check for:
- Remaining blood, tissue or visible debris.
- Corrosion, pitting, cracks or damaged surfaces.
- Bent tips or misaligned jaws.
- Stiff hinges or faulty ratchets.
- Damaged cutting edges or serrations.
- Loose parts or other functional defects.
Remove instruments that cannot be adequately cleaned or that are damaged or not functioning correctly. Follow the facility’s repair, replacement or disposal procedures.
For additional guidance on maintaining reusable instruments, see FRAGO IMPEX’s article on why surgical instruments develop rust and how to prevent it.
Step 6: Preparation and packaging
After cleaning, drying and inspection, prepare instruments according to the device and packaging manufacturers’ instructions.
Typical preparation includes:
- Opening hinged instruments when instructed.
- Disassembling removable parts where required.
- Arranging instruments so the sterilant can reach the necessary surfaces.
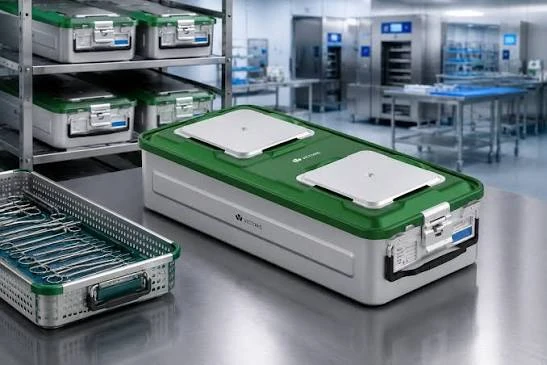
- Using packaging or containers compatible with the selected process.
- Avoiding arrangements that prevent proper exposure or drainage.
Packaging should permit sterilant penetration while maintaining a suitable barrier against contamination after processing.
Not all packaging is suitable for every sterilization method.
Step 7: Loading the autoclave
Load the sterilizer according to its instructions and the validated load configuration.
Avoid overloading trays or arranging instruments in ways that obstruct steam circulation. Keep items separated as required, and position instruments to support effective exposure and drainage.
The correct arrangement depends on the sterilizer design, packaging, tray configuration and load contents.
For suitable equipment, explore the FRAGO IMPEX autoclave range.
Step 8: Select and run the correct cycle
Choose the validated cycle for the specific instruments, packaging and load.
The sterilization process must meet the required parameters, including exposure time and temperature and other applicable operating conditions. These cannot be selected safely from a general online chart without considering the specific device and equipment.
Do not assume that every instrument can be processed using the same cycle.
Follow the manufacturer’s instructions and facility procedures, including any required pre-cycle tests and routine maintenance.
Step 9: Monitor and verify the cycle
Sterilization monitoring generally combines three types of information.
| Monitoring type | What it checks |
|---|---|
| Mechanical or physical | Cycle parameters such as time, temperature and pressure, as applicable |
| Chemical indicators | Whether specified process conditions were encountered |
| Biological indicators | Whether a standardized biological challenge was inactivated under the test conditions |
The monitoring schedule and indicator requirements depend on the sterilization method, equipment, applicable standards and facility policy.
Chemical indicators do not independently prove sterility. Likewise, a satisfactory machine display should not be treated as the only evidence that a load can be released.
The CDC’s monitoring recommendations provide further guidance.
Step 10: Cool, inspect and release
Allow processed items to cool and dry as required before handling or storage.
Inspect packaging for moisture, tears, punctures, broken seals and other defects. Review the cycle record and required monitoring results before releasing the load.
Items associated with a failed cycle or unacceptable monitoring result should not be used. Follow the facility’s documented response and reprocessing procedures.
Step 11: Store sterile instruments correctly
Store processed instruments in a designated clean, dry area protected from contamination and damage.
Use storage conditions and handling practices that preserve package integrity. If a package becomes wet, torn, punctured or otherwise compromised, it should be managed under the facility’s established policy rather than assumed to remain sterile.
Follow applicable event-related or time-related storage policies and any relevant local requirements.
Common Mistakes in Surgical Instrument Sterilization
Even when a facility has suitable equipment, errors in the processing workflow can compromise the outcome.
1. Sterilizing instruments without adequate cleaning
Residual blood, tissue and other debris can interfere with effective processing. Instruments must be cleaned thoroughly before sterilization.
2. Using the wrong sterilization cycle
A cycle suitable for one device or load may not be suitable for another. Follow the validated instructions rather than relying on a universal time and temperature.
3. Overloading trays or the chamber
Poor loading can interfere with sterilant penetration, circulation or drainage. Follow the equipment manufacturer’s loading instructions.
4. Using incompatible packaging
Packaging must be suitable for the selected sterilization method and load. Incompatible materials may prevent effective processing or fail to maintain sterility afterward.
5. Ignoring monitoring results
A completed cycle is not sufficient if the required indicators or physical records show a problem. Follow the established load-release and failure-response procedures.
6. Storing instruments before they are adequately dry
Moisture can contribute to corrosion and may compromise packaging. Follow validated drying and cooling requirements before storage.
7. Releasing wet or damaged packages
Wet packs and compromised packaging require assessment under the facility’s policy. Do not treat them as acceptable sterile supplies without appropriate corrective action.
8. Neglecting maintenance and staff training
Equipment maintenance, process verification, current procedures and trained personnel are essential parts of a reliable sterilization programme.
How to Choose an Autoclave for a Clinic or Hospital
Selecting an autoclave requires more than comparing chamber sizes or advertised cycle times. Procurement teams should evaluate the equipment against their actual instruments, workload and processing requirements.
Chamber capacity
Consider the size and number of instrument sets processed per cycle, the dimensions of trays and the volume of work during busy periods.
A larger chamber is not automatically the better choice if it is unsuitable for the facility’s workload or available space.
Intended load and cycle compatibility
Confirm that the equipment supports the specific instruments and packaging that the facility intends to process.
Check the validated cycles, loading requirements and any restrictions on hollow, wrapped or complex devices.
Monitoring and documentation
Evaluate the available cycle records, alarms, monitoring requirements and documentation features. Ensure the facility can meet its applicable quality assurance and traceability procedures.
Installation and maintenance
Consider electrical and utility requirements, installation space, servicing arrangements, consumables and staff training.
Compliance and support
Verify the applicable Malaysian regulatory requirements, relevant equipment documentation and supplier support before purchasing.
FRAGO IMPEX lists several sterilizer options in its autoclave product category, including the ICANCLAVE Class B T218 and ICANCLAVE Class B T223. Compare their current specifications and instructions against the facility’s requirements before selecting a model.
Surgical Instrument Sterilization Checklist
The following checklist can support a facility’s internal workflow review. It is not a substitute for a validated standard operating procedure.
Reprocessing Workflow Review Checklist
Use this checklist to review the surgical instrument reprocessing workflow in your healthcare facility.
- ☐ Contaminated instruments collected and transported safely.
- ☐ Initial care performed according to the instrument manufacturer’s instructions.
- ☐ Instruments cleaned and rinsed thoroughly.
- ☐ Instruments dried and inspected for cleanliness and proper function.
- ☐ Removable parts prepared according to the manufacturer’s instructions.
- ☐ Compatible sterilization packaging used where required.
- ☐ Instruments arranged according to the sterilizer manufacturer’s instructions.
- ☐ Correct validated sterilization cycle selected and completed.
- ☐ Required physical, chemical and biological monitoring performed according to facility policy.
- ☐ Cycle records reviewed and the load released according to established procedures.
- ☐ Packages inspected for moisture, tears and other damage.
- ☐ Sterile instruments stored in a clean, dry and protected area.
Important: This checklist is intended for general workflow review and does not replace validated standard operating procedures, manufacturer instructions or applicable healthcare regulations.
Frequently Asked Questions
What is the most common method of surgical instrument sterilization?
Steam sterilization using an autoclave is the preferred method for many critical surgical instruments that tolerate heat, moisture and pressure. Other methods may be necessary for devices that are incompatible with steam.
Can surgical instruments be sterilized without cleaning them first?
No. Instruments must undergo appropriate cleaning before sterilization. Organic material and other residues can interfere with the process, so visible cleanliness and the required cleaning procedure are important prerequisites.
What is the difference between an autoclave and a dry heat sterilizer?
An autoclave uses steam under pressure, whereas a dry heat sterilizer uses heated air. The appropriate method depends on the device’s material compatibility, intended use and validated processing instructions.
How long does surgical instrument sterilization take?
There is no single duration for every instrument or sterilizer. The required cycle depends on the equipment, cycle type, load, packaging and validated instructions. Drying and cooling may also add time to the overall workflow.
Are chemical indicators enough to confirm sterilization?
No. Chemical indicators provide information about exposure to specified process conditions, but they do not independently establish sterility. Facilities should use the required combination of physical, chemical and biological monitoring according to their procedures.
How should sterile surgical instruments be stored?
Store them in a designated clean, dry area under conditions that protect package integrity. Packages that become wet, torn, punctured or otherwise compromised must be managed according to the facility’s reprocessing policy.
Can all surgical instruments be sterilized in an autoclave?
No. Some instruments or components may be damaged by heat, moisture or pressure. Always check the manufacturer’s instructions and use a compatible, validated reprocessing method.
What should a clinic consider before purchasing an autoclave?
Consider chamber capacity, intended loads, cycle compatibility, monitoring and documentation features, installation requirements, maintenance support and applicable regulatory requirements.
Conclusion
Effective surgical instrument sterilization depends on a complete, controlled reprocessing workflow—not simply on running an autoclave cycle.
Thorough cleaning, careful inspection, compatible packaging, correct loading, validated cycle selection, monitoring and protected storage all contribute to reliable instrument reprocessing.
Hospitals and clinics should establish written procedures, train staff, maintain equipment and follow the manufacturer’s instructions for every reusable device. When selecting sterilization equipment, the priority should be compatibility with the instruments and the facility’s validated processing requirements.
For surgical instruments and sterilization equipment, FRAGO IMPEX SDN BHD provides product information for healthcare facilities and procurement teams in Malaysia.
Contact FRAGO IMPEX SDN BHD
- Address: No. 107, Jalan 17/42, Taman Lawa, Off Jalan Kuching, 51200 Kuala Lumpur, Malaysia
- Telephone: +603-6252 5637
- WhatsApp: +6019 222 4786
- Email: info@fragoimpex.com
- Sales: sales@fragoimpex.com
- Website: www.fragoimpex.com